
Simplified introduction to ACES workflow:
Here is an overview of how Academy Color Encoding System – ACES works in DaVinci Resolve (as I see it for now). Other platforms like Nucoda, Baselight, and Scratch all handle ACES in their own way, but the main approach is the same. This is a simplified approach and I think it will help you understand it better:
ACES generally is a linear color space with almost infinite colors and around 30 stops of latitude. Most modern cameras like Arri, Red and BlackMagic cameras utilize a wide gamut sensor, (i.e. producing more color information compared to lower 10 and 8-bit cameras), and ACES makes use of the wide gamut color data. Think of it as slide scanned at 2400 dpi versus regular images that are scanned at 100 dpi.
The actual math is more precise, but you get the idea.
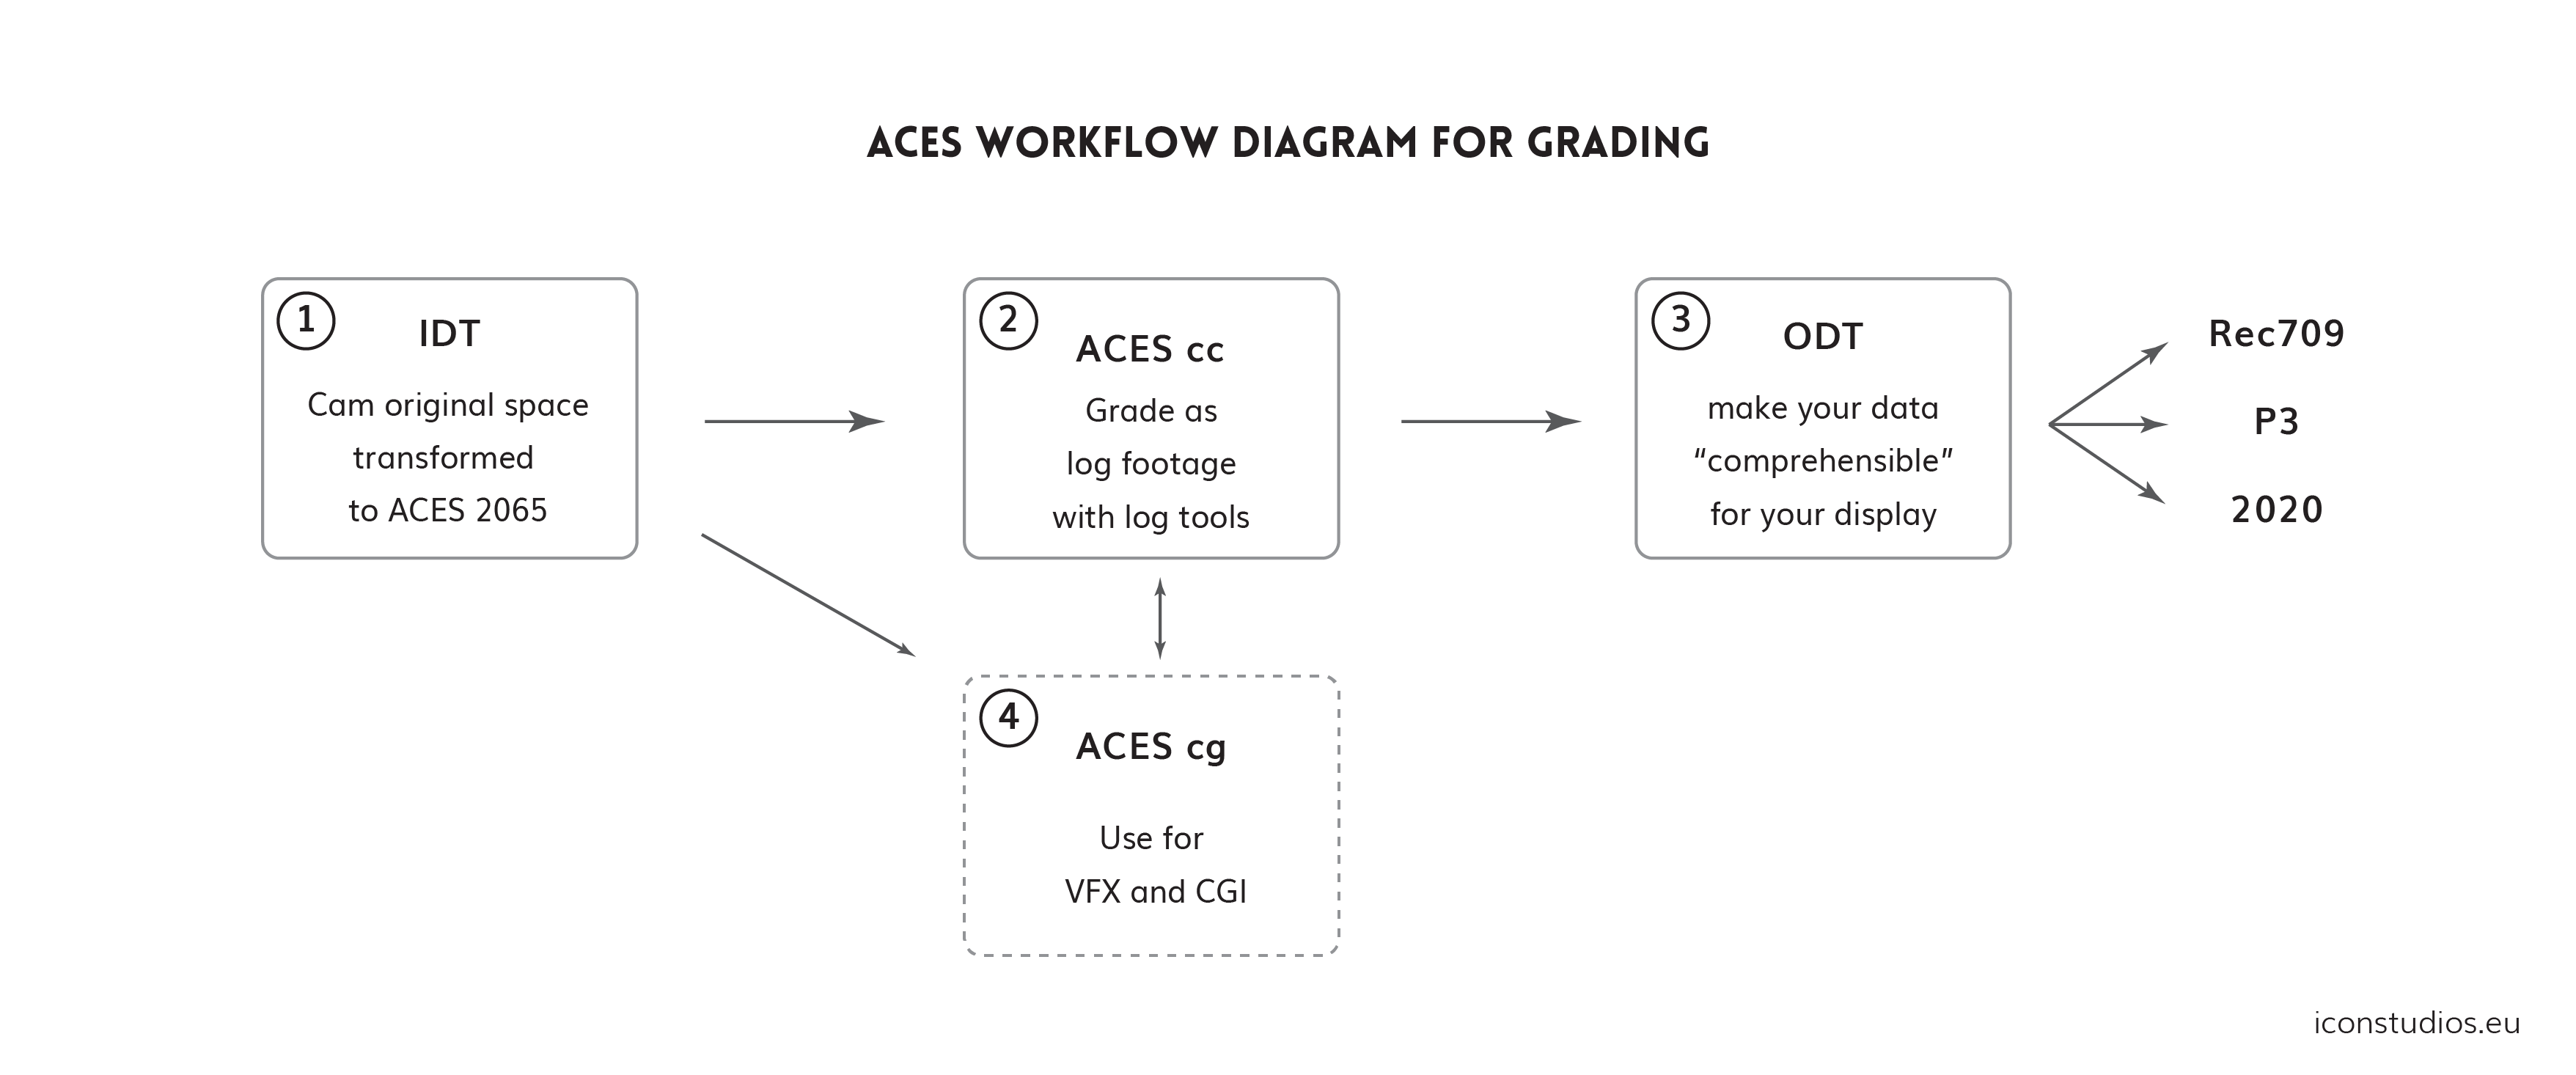
There is 3 main parts to ACES while grading:
- First is the input transform (IDT). The input transform converts camera color data to the ACES color space and because every camera manufacturer have crafted their own color secret sauce, ACES allows you to bring various camera images into a uniform working space.
- Secondly, ACEScc is the commonly used color space for grading, which is like a conversion of linear space to log (ACES2065 linear > ACEScc log), making it easier for a colorist to grade using log tools.
- Third is the Output Display Transform (ODT) which makes your ACES or ACEScc display properly on all devices. It is important to select an ODT based on your device capability, for example, REC709, P3, and 2020. Ideally, they all should look the same if calibrated to their native standard. When new devices will come to market with better color gamut they can be used on the same principle and not to worry about redoing all the work you have done in grading already.
The first step is to set your Resolve Color Management to ACEScc, then set your output display transform (ODT) to rec 709. I usually leave the input transform blank for my project settings and set the transform for individual clips on the color page or in the media pool clip parameters. Why? Often, a project contains original media from multiple different cameras like Arri, Red, and BlackMagic for example, and if you’ve been using Resolve 15 you may have noticed that software automatically transforms raw camera files with the correct IDT. I think big workflow pipelines would benefit from this a lot as every minute you shave off the process is gain that can be used elsewhere. However, if there are files in a project like ProRes or DNxHD that aren’t RAW from a camera, you can manually select the correct transform.
I grade with log tools as ACEScc behaves like log. Adjust offset for WB, adjust contrast – pivot and master offset (exposure in a way), Hue and also saturation or color boost if needed. Most of the time i even do not use rings or balls of my Elements panel to adjust and if i do need then midtone ball is the one that mostly use. Less and less i need to adjust highlight or shadow separately. So in a way i start with few nodes for normalizing master offset (exposure), contrast and WB. If it feels off i use hue to line up shots to mach more evenly. Later on i start to build look on top of it like usually either with curves or regular log tools.
I have heard keying seems to be issue for some users with Resolve in ACES. So what can you do to get around that? I find a good option is to do it after “normalizing” the image and work with HSL key. Also consider using the blur option in the key tool as needed.
I find that it’s really helpful to use scopes with the HML tool. It is the most valuable thing you can have in your studio that helps you get a clean starting point fast with tight, shot to shot consistency.
Recently I read a comment on a Facebook Group posted by Walter Volpatto about efficient workflows that he uses, and it turns out my approach is very similar.
- Start with the input transform (which in this example is done already before nodes either automatically in Resolve 15 or by manual selection)
- Normalize your shot
- Create the look on key shot as shared node or post group to use over scene
- Add grain, or FX like film damage also as shared node or even on timeline level
- Add finishing touches like vignetting and masks
What Walter described is very clever and efficient approach in my opinion. You set the look your director wants for a scene and then normalise everything as close as you can with the look already intact. This works the best with well-captured material that is equal in exposure and lighting and really speeds things up. There are times when I have to do that shot by shot in more detail, when they don’t match, but that’s more a production issue than ACES or grading.
I wanted to point out that for VFX, it’s always a good idea to use linear, wide gamut, 30 stop material with no gamma at its core. This simplifies the entire process and your team will be happy they don’t have to manage a gazillion luts just to display the images correctly. In this way, ACES is helpful for post houses of every size—big, medium and small.
To conclude my rant, here’s why Academy Color Encoding System – ACES is my go to color system
- Fast, clean results
- Easy to manage in a VFX pipeline
- Easy to monitor
- Make the most out of your grading with wide-gamut media
- About 30 stops of latitude and no gamma issues
- Behaves more like film and less like video
I hope that helps you out and shows how you can approach your workflow using Academy Color Encoding System ACES.
If you have any questions please send them here or in contact and I will do my best to help.
For more detailed info and discussions about ACES visit https://acescentral.com/
Thank you, Margus. Would yo be able to post a short video tutorial of this process?
I have never thought about doing any video tutorials. Maybe in later date but then there is the question if over simplified approach will add more confusion or help.
I like ACES until… it drives me crazy. Why? The output transform curves are built in. When the material doesn’t fit the curve, it can be very challenging to grade.
I would much rather have a system like photoshop where only the color space is automatically transformed, and the output curve is in the control of the artist.
If there is a way around this issue in Resolve ACES, please let me know!
We should compare notes when you have shot like this at hand. I have yes seen some material that was on border line but it should be repairable usually.
Fixed curve serves it’s purpose as well when different departments work together it seems to me for now.
If we keep all by standard then we just move around linear data and LMT “look” and all other bits are the same for everybody. This has been the thing for many features i have worked on as color and vfx departments are not on the same page and it make good mess out of it.
> I would much rather have a system like photoshop where only the color space is automatically transformed, and the output curve is in the control of the artist.
But in Photoshop the image you are working with is already display referred, so you are only converting between different display spaces. ACES is scene referred, and a scene to display referred conversion requires some level of curve adjustment. Even for HDR display you want some tone mapping. You can argue whether the base “look” of the ACES RRT adds too much contrast. But some contrast increase is needed for all displays, and some highlight roll-off as well for SDR displays.
This is very good explanation!
I had something like that in my mind but was not able to express it so clearly scene vs display and then regarding to displays as well.
For universal usage over many locations and vfx and so on it seems like good option. I’m just talking to VFX guy getting files from a studio in many many color spaces and it is again the regular mess.
I have done some jobs with rather low contrast and soft looks also in ACES system and it did not bother me at all as i could always counter balance everything like the story or the feeling needed. Does this make any sense?
Hey Margus, thanks for this. I have used ACES on two jobs and only because they had shot bright practical lights in almost every shot. Working in ACES meant the highlights retained some detail and when they did blow out it looked more like over exposed film and less digital. Quite a cool result really. But other than that I don’t have any benefit from using it at the moment. Do you know of a way to get this effect on the highlights when working in REC 709? I’m using DaVinci.
Thanks,
Jonny
I have never tried it but I assume working in linear before log to rec709 would make this possible in theory.
I would think using colorspace transform from ofx tab to do it.
Thanks Margus. I’ll try that tomorrow.
Thank you for the post Margus. Leaving the IDT blank and set the transform to individual clips is a great advice! I have two questions. Why do you prefer ACEScc over cct color science? And what is your choice in the ‘Process Nodes LUT in’ setting of the Color Management page of DR15? Cheers!
Hi.
Glad it helped you!
I chose cc because it is actual standard version and cct is somewhat modification.
AP1 CC
Hope this helps.